Setup Jenkins and test a PHP project
19 Apr 2015After a chat with some other developers on Twitter the other day I offered to write a tutorial on how to setup Jenkins from scratch and create a job to test a PHP project.
For this tutorial I’m going to use a Digital Ocean droplet (get $10 free credit with this link) but you can use a server from anywhere.
Once I’ve installed and setup Jenkins I’m going to create a job to test my Proton framework.
Setup the server
First create a new Ubuntu server - I’ve used a $5/month 512mb box but if you’re going to use Jenkins for multiple production projects I recommend you use a server with at least 2gb of RAM to keep your builds speedy.
Once the server has powered up then SSH in. We’re going to need a few tools installed:
Jenkins runs on port 8080 by default so we’re going to setup an Nginx proxy which listens on port 80 and proxies to Jenkins. We’ll also point a subdomain at it.
With my DNS provider I setup an DNS A record for jenkins.alexbilbie.com pointing at the IP address of my server.
Next I updated /etc/nginx/sites-enabled/default with the following setup:
server {
  listen 80;
  server_name jenkins.alexbilbie.com;

  location / {
    proxy_pass              http://localhost:8080;
    proxy_set_header        Host $host;
    proxy_set_header        X-Real-IP $remote_addr;
    proxy_set_header        X-Forwarded-For $proxy_add_x_forwarded_for;
    proxy_connect_timeout   150;
    proxy_send_timeout      100;
    proxy_read_timeout      100;
    proxy_buffers           4 32k;
    client_max_body_size    8m;
    client_body_buffer_size 128k;

  }
}
Now to bounce Nginx service nginx restart and start Jenkins service jenkins start.
I can now open up Jenkins in my browser:
Security
First thing to do is secure Jenkins. When you’re working in a team by far the easiest way is to use Github to secure your Jenkins installations using OAuth.
To enable Github security up we need to install a few plugins, on the left hand side click on Manage Jenkins then Manage Plugins.
Click on the Available tab then select the following plugins (you can use the search field to narrow down the list):
- Github OAuth Plugin
- Github Plugin
Click Download now and install after restart. Jenkins will now download the plugins and restart itself.
Whilst Jenkins is doing that head over to Github, go to Settings then Applications. Click Register new application.
I used the following settings:
- Application name:
jenkins.alexbilbie.com - Homepage URL:
http://jenkins.alexbilbie.com - Authorization callback URL:
http://jenkins.alexbilbie.com:8080/securityRealm/finishLogin
Finally click Register application.
Back in Jenkins click on Manage Jenkins then Configure Global Security. Check the Enable security checkbox.
Under Security Realm click on Github Authentication Plugin.
I used the following settings:
- GitHub Web URI:
https://github.com - GitHub API URI:
https://api.github.com - Client ID: (the client ID that Github gave you for your application)
- Client Secret: (the client secret that Github gave you for your application)
Under Authorization choose Github Commiter Authorization Strategy.
Update the following:
- Admin User Names: (your Github username)
- Enable Grant READ permissions for /github-webhook (so that Github can ping your Jenkins install)
- Click Save. You’ll now be sent to Github to sign-in:
Install Composer
We need to install Composer so whilst SSH-d into the server run the following (as root):
su jenkins
mkdir ~/bin
cd ~/bin
curl -sS https://getcomposer.org/installer | php
mv composer.phar composer
By installing Composer as the jenkins user we can keep it updated easily with Jenkins itself.
Create an SSH key for Jenkins
Jenkins needs an SSH key in order to commit back to Github (if that’s what you want). There are two options here, either create a new Github user or add a deploy key to the repository. For this tutorial I’m going to add a deploy key.
As the Jenkins user run the following - ssh-keygen -t rsa -C "jenkins". I opted to not create a password for the key.
Copy the public key (~/.ssh/id_rsa.pub) to your clipboard and add it as a deploy key in your Github repository:
Next let Jenkins know about the private key. Click on Credentials then Global credentials (unrestricted) then Add Credentials.
Choose SSH Username with private key, add a username (I used jenkins) and add the private key (~/.ssh/id_rsa). Click OK.
Add your first job
Click New Item, add Proton as the project name then choose Freestyle project.
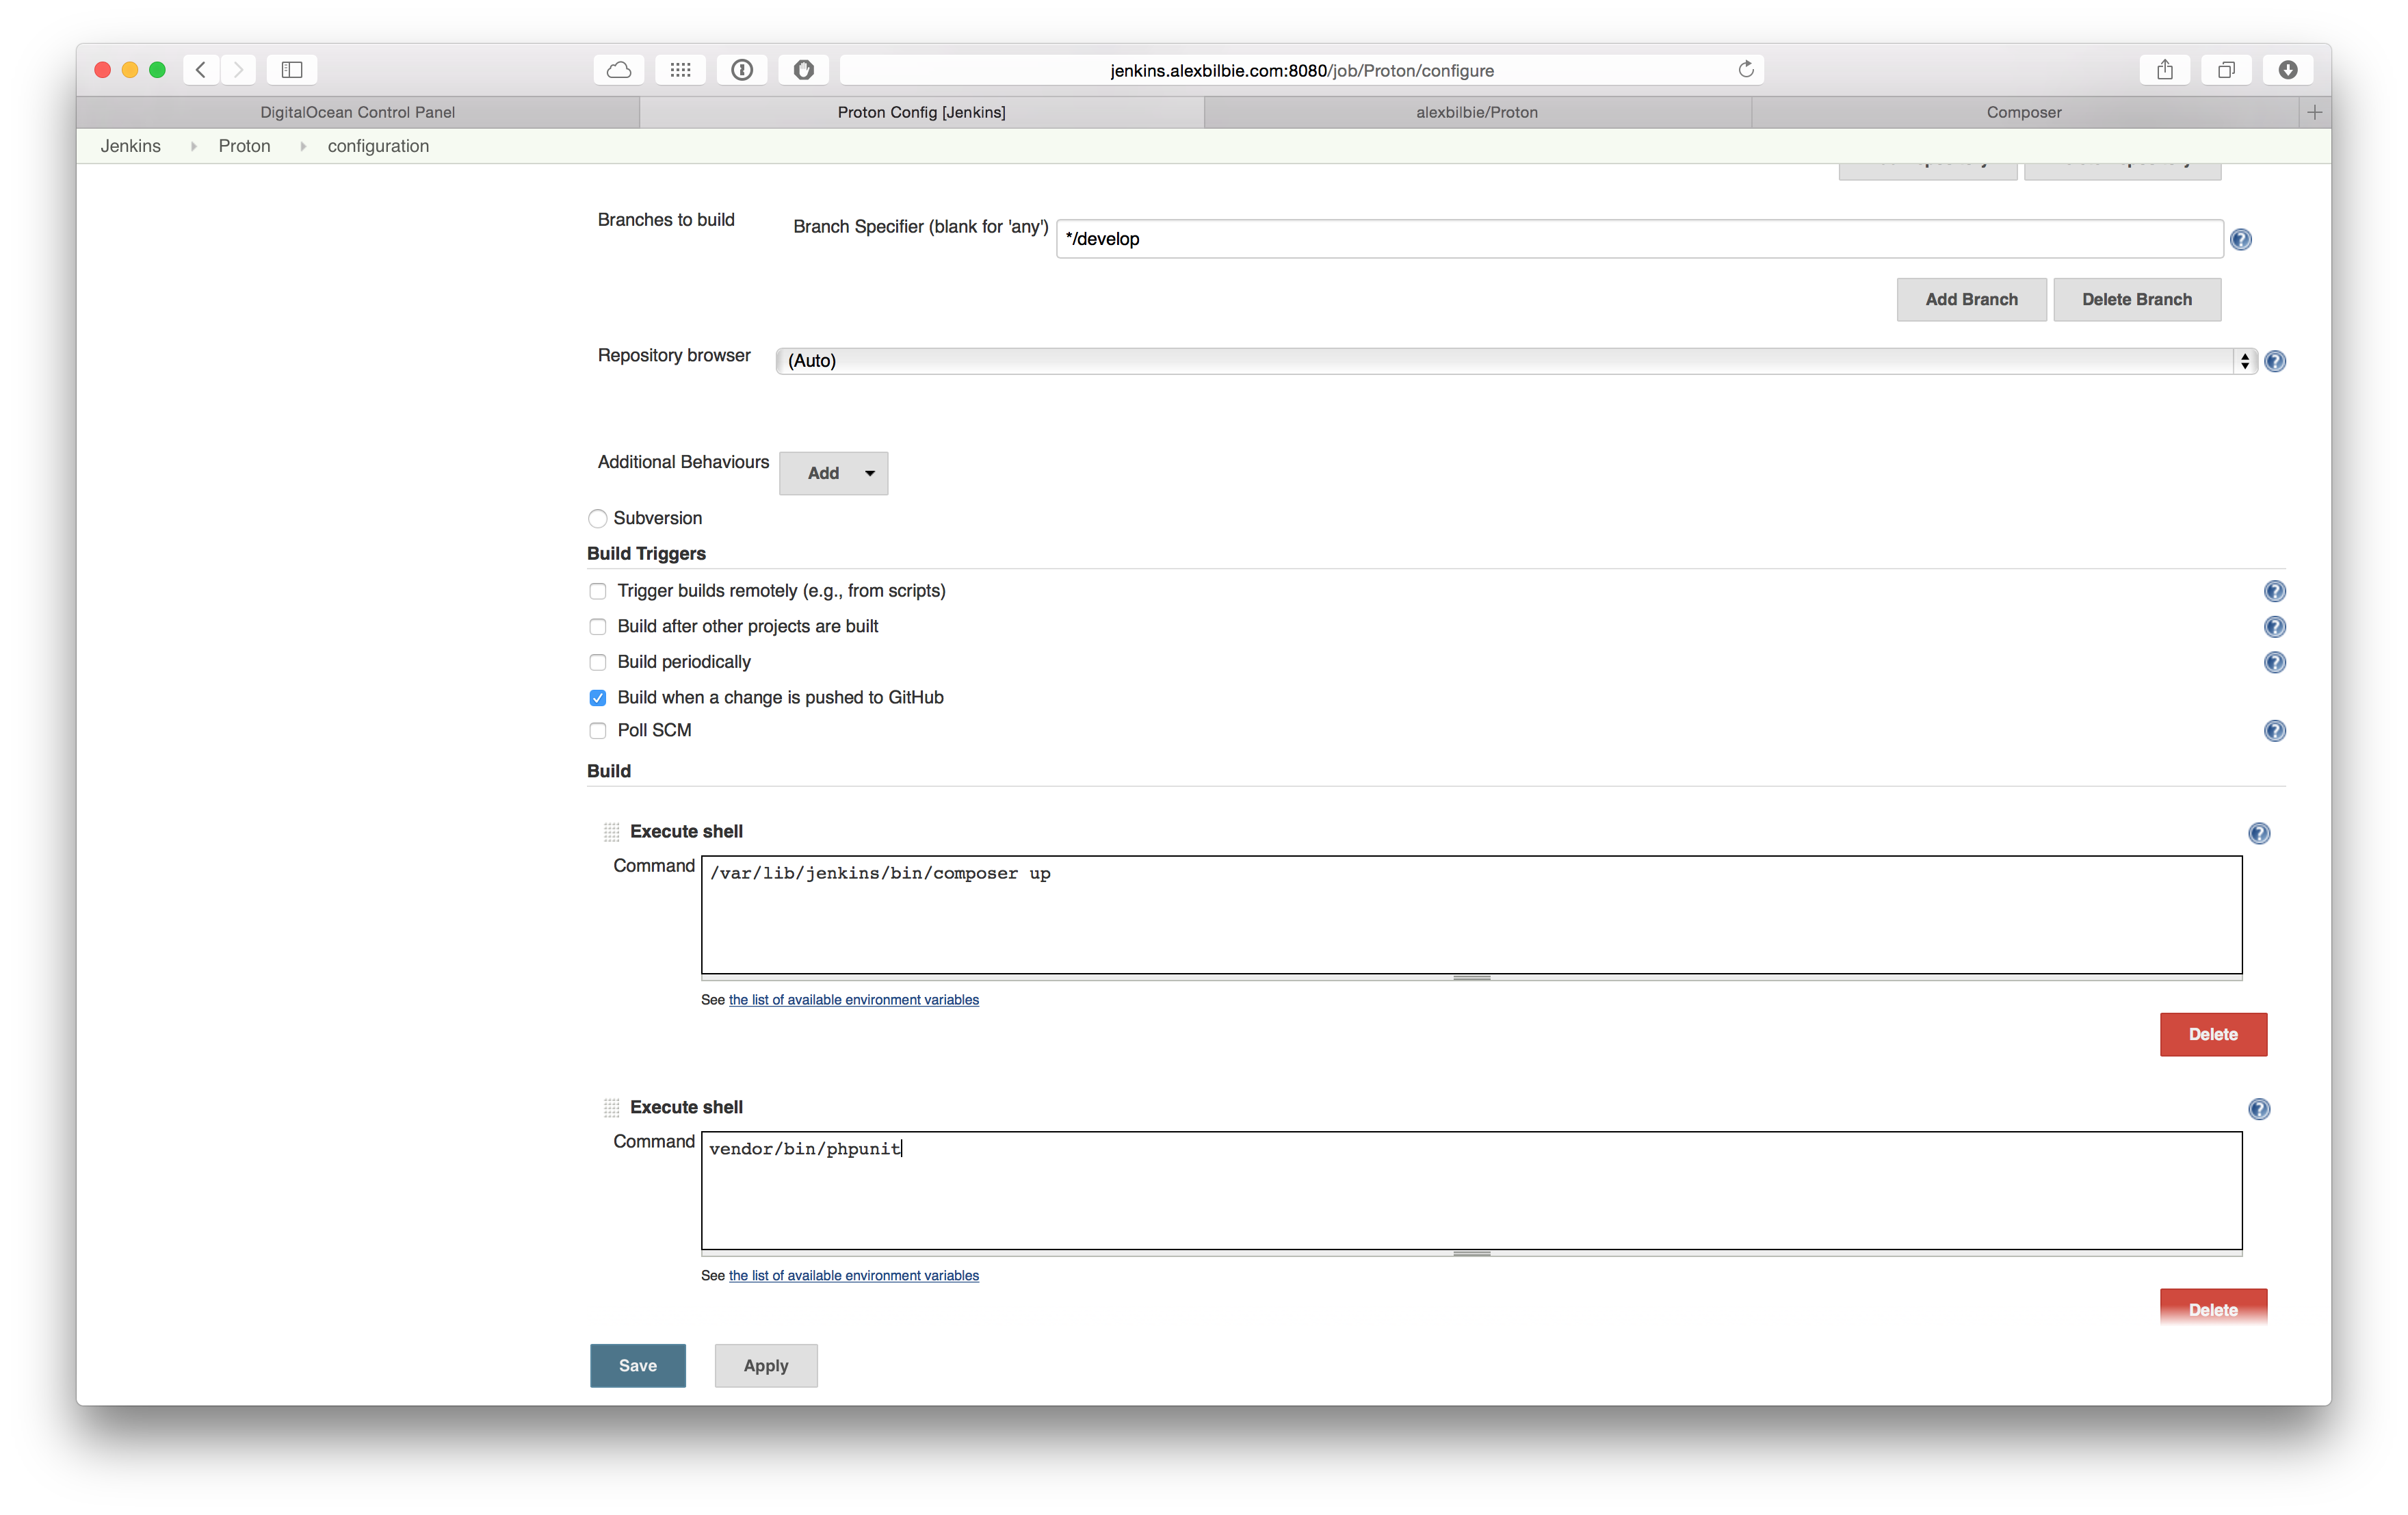
Setup the project like so (click on the images for a larger view):
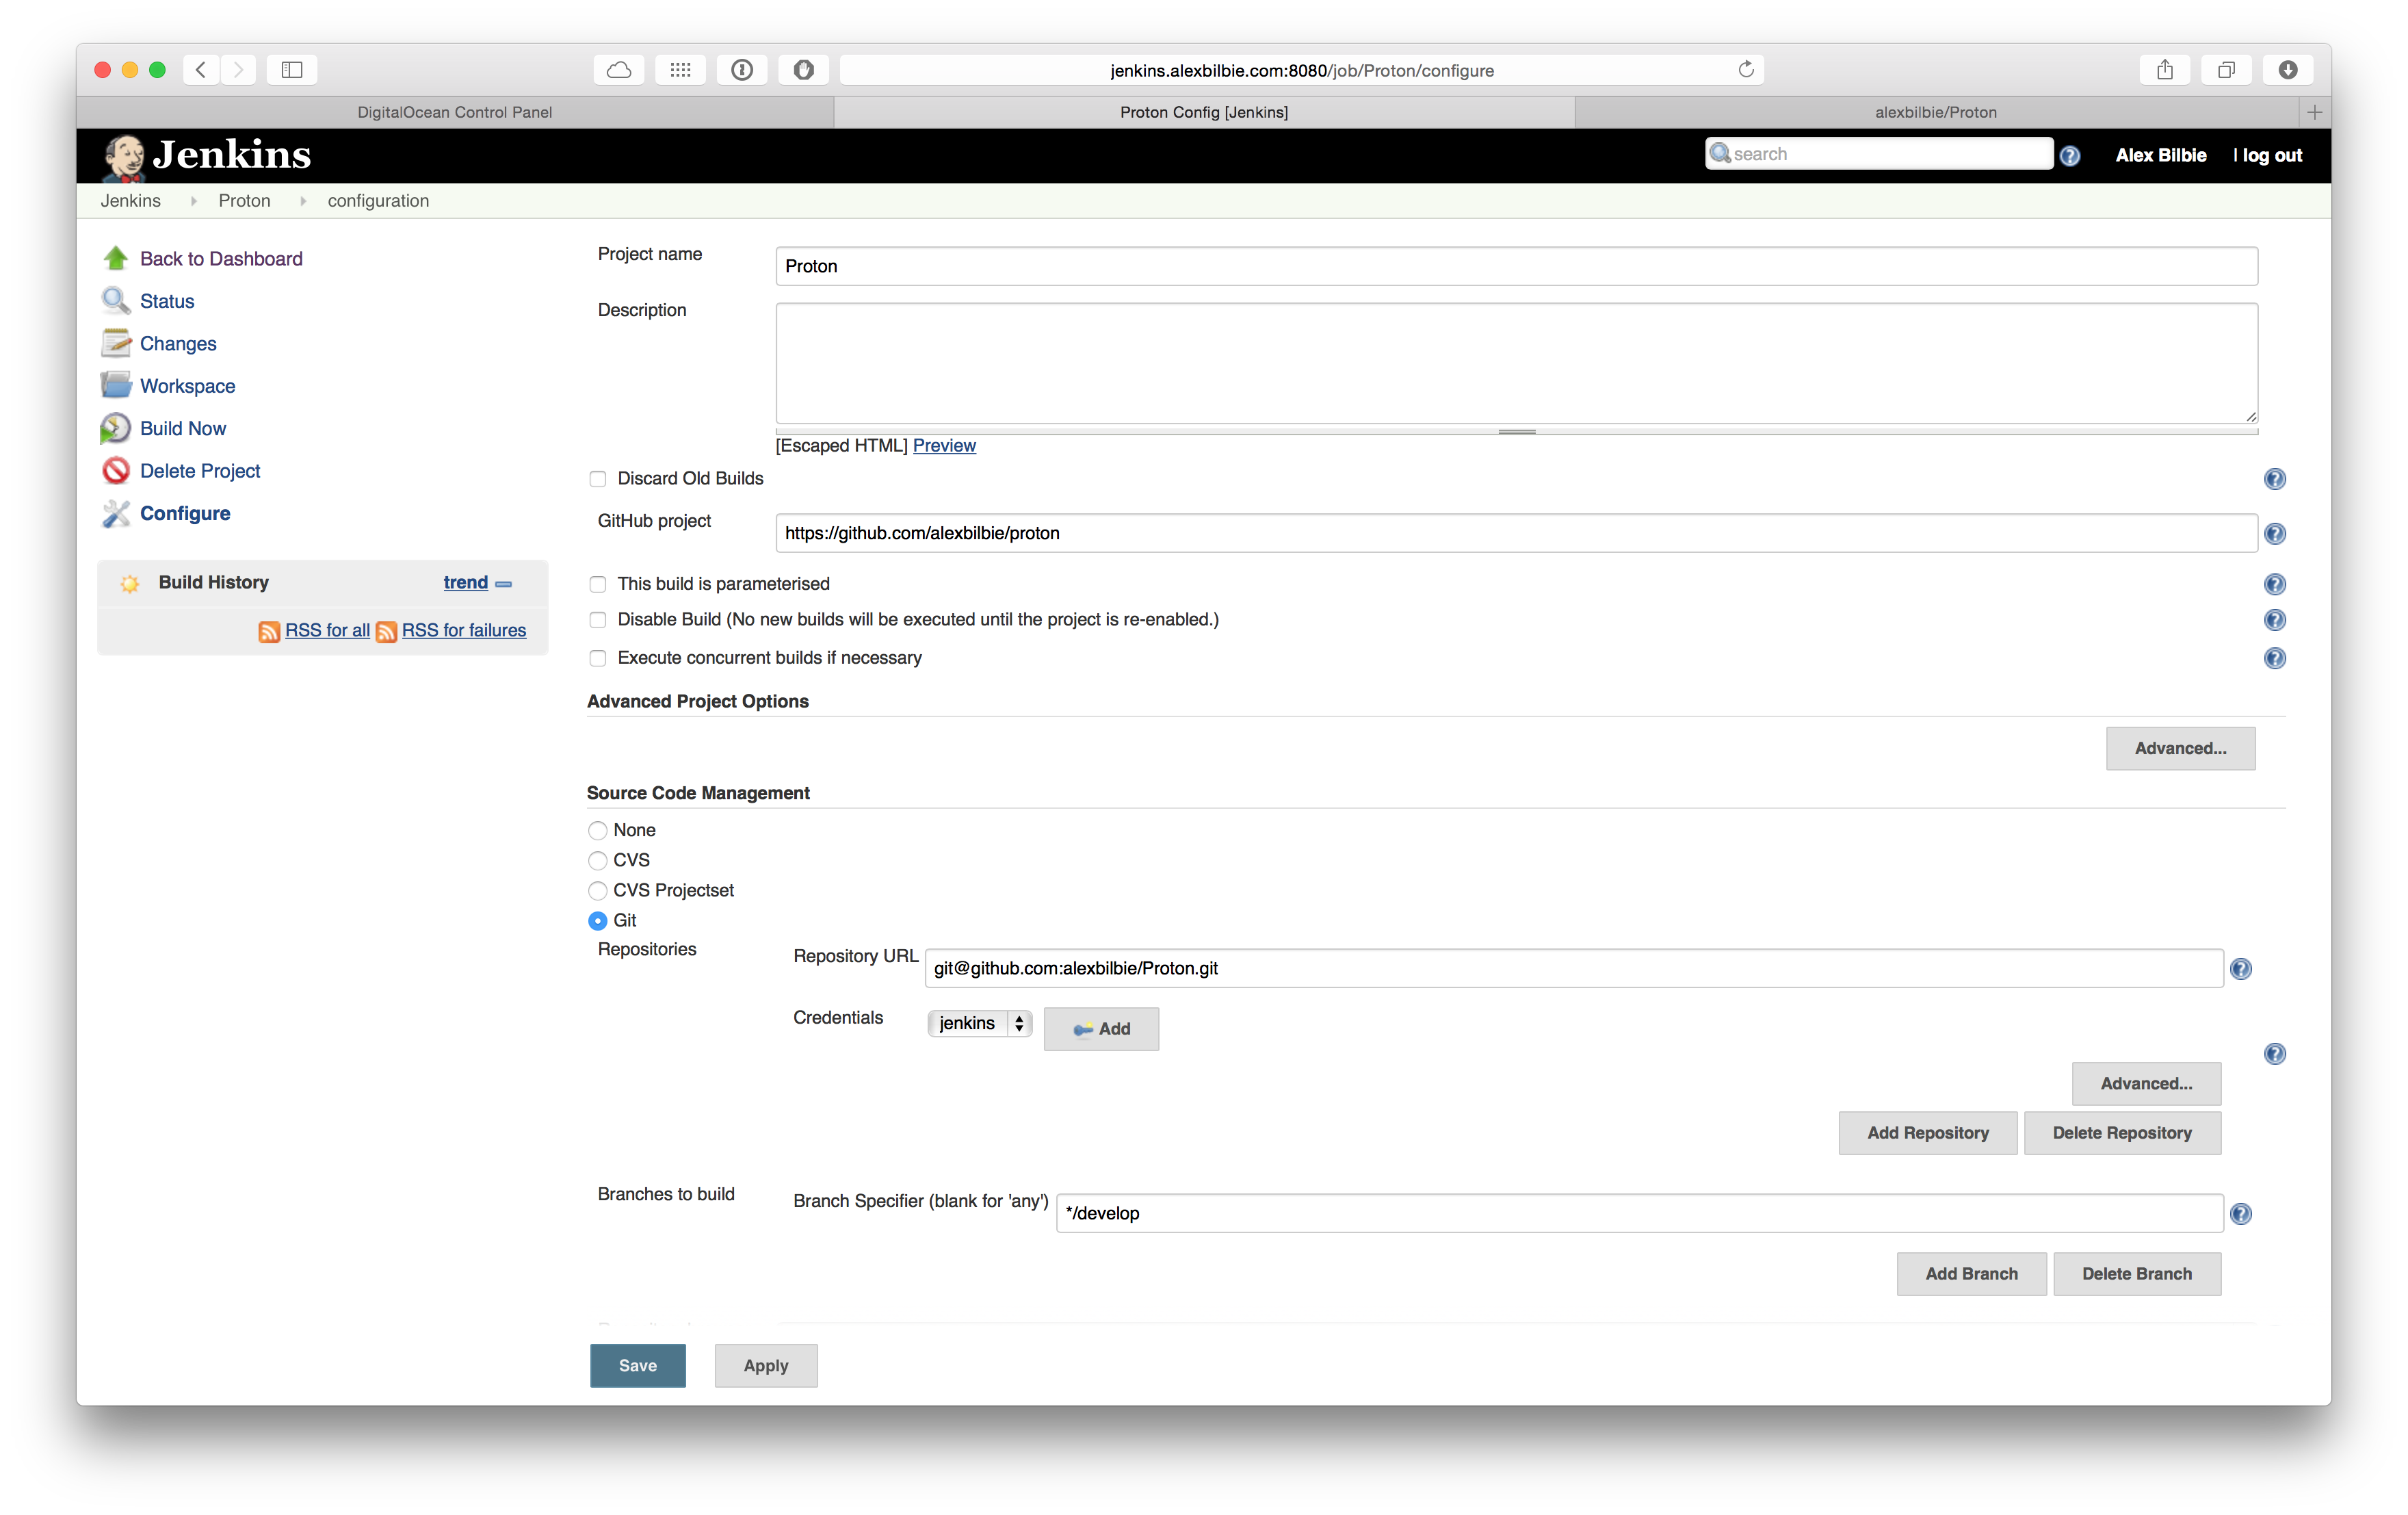
Click Save.
In the project screen you can now click Build Now. If you’ve copied my config as above you can see in the output for the project that Jenkins will do the following:
- Set up a new project workspace
- Clone the repository
- Run
/var/lib/jenkins/bin/composer up - Run
vendor/bin/phpunit - Write the message
Finished: SUCCESS
To get Github to automatically trigger a build when a change is pushed go into the repository Settings, then Webhooks and Services, choose then Jenkins (Github plugin) service.
I set the Jenkins hook URL to https://jenkins.alexbilbie.com/github-webhook/.
Now when I push a commit to the develop branch Github will ping Jenkins and automatically trigger a build.
Next steps
Now that you’ve got a successful build you can make use of some Jenkins plugins to make Jenkins more useful.
- If you want to visualise PHPUnit code coverage then the Clover PHP will ingest a
clover.xmlfile created by PHPUnit and create a graph on the job home page. You can also use it to ensure a minimum amount of coverage or the project will be marked as unstable or even fail the build. - Other plugins that create graphs and logs from PHPUnit and other QA tools include:
- Checkstyle (for processing PHP_CodeSniffer logfiles in Checkstyle format)
- Crap4J (for processing PHPUnit’s Crap4J XML logfile)
- DRY (for processing phpcpd logfiles in PMD-CPD format)
- JDepend (for processing PHP_Depend logfiles in JDepend format)
- Plot (for processing phploc CSV output)
- PMD (for processing PHPMD logfiles in PMD format)
- xUnit (for processing PHPUnit’s JUnit XML logfile)
- The HTML Publisher allows you to keep HTML reports generated by your tests and link to them from a job page.
- The AnsiColor plugin adds support for ANSI escape sequences, including color, to the build output.
- You can report build statuses back to Hipchat, Slack and IRC with respective plugins.
- This plugin allows you to run tasks like shell scripts after builds finish - I use it to stop Docker containers that I’ve used in my builds.
- The S3 publisher plugin will create an archive from a successful build and push it to Jenkins (which you could then automatically pull on to you servers to deploy new code).
- One of my favourite plugins is the Big Monitor plugin which I have running on a TV (projected from a spare Mac Mini using a Chromecast). This is opposite my desk in the office and I can see all of my jobs and their current status (which of course are always green…).
Jenkins can execute shell scripts as part of build jobs so you can use this to perform pretty much any task you want, from starting Docker containers, keeping Composer up to date (I have a job dedicated to this that runs once a week), API testing, or just about anything else that you manually do on the command line.
There are plugins to automatically build pull requests and you can set up upstream and downstream jobs that are run before and after other jobs.
I use these extensively so when I push to the develop branch of one of my projects I have certain tests run which when they pass automatically merge develop into master. I then have another job which listens to master which then has other tests run and packages up the code into an archive on S3 on success. I then have a final job that is triggered to run an Ansible task to deploy the code on S3 onto all my servers.
One word of advice, once you’ve got a working Jenkins setup try to keep it that way; I’ve been burnt numerous times by plugin updates that have broken or significantly slowed down my builds. If that happens you can easily downgrade a plugin inside the plugin manager.
Hopefully you’ve learnt from this tutorial just how easy it is to get setup and running with Jenkins and I’m sure like me in time you’ll find it to be an invaluable part of your development stack.